Monday, 4 December 2017

Card Drive Wrap-up
Hello Crafty friends, 
This year's Caring Hearts Card Drive is wrapping up for 2017. Here in Canada, we received more cards than ever! A total of almost 9000. I spent all day yesterday with some volunteers and friends, sorting and boxing up the cards for mail and hand delivery (thank you SO MUCH, Carole and the crew at Crop-a-While) . But we still have many more that need a home...  If you know of a nursing home in your area which would enjoy receiving the cards to distribute to their residents, please let me know.  It is especially meaningful if you have a connection with someone there--a family member who is a resident, or if you know someone who works at the home. We hear that the staff enjoy looking at the cards almost as much as the seniors who receive them!
Here in Ottawa, we also received some local publicity for the drive. See the story HERE
Thanks to all who contributed to make this year's drive such a success!
Caroline 
P.S.  What is a blog post without some eye candy?
Beautiful thank you card created by contributor LC Lamothe. And it matches my tea cozy!!

Sunday, 8 October 2017

Caring Hearts Card Drive 2017

Hello my crafty friends,
It's time again for the Caring Hearts Card Drive

This event is now in its eighth year!!! Last year's response was overwhelming--64,000 hand-made Christmas and holiday cards donated and distributed to nursing home residents in the United States, Canada, Australia and Great Britain.  Vera Yates, the true heart 💓 behind the drive, is willing to do it again. You can check out all the details HERE on her blog.

Briefly, the idea behind the drive is to brighten the holidays for residents of long-term care facilities by sending them signed, hand-made cards, with wishes from the creator. We all love to make beautiful things, why not let them have a heart-felt purpose; a way of paying it forward. I have had letters from some of the facilities to which we send cards, telling us how much they mean to the recipients. One gentleman, who has received cards several years in a row, asked "I wonder where my card will come from this year?" Please know your cards are cherished.

In 2016, my partner in crime, Rita Andrews in Cochrane, Alberta, and I managed to send 5700 cards to 20 different seniors' residences in ten provinces, and two of the three territories. Several more nursing homes received cards along with pet therapy visits, thanks to our partnerships with PATS in Victoria BC, Blue Ribbon Therapy Dogs in Montreal, St. John's Ambulance Dog teams in Nova Scotia and PEI, and Ottawa Therapy Dogs, here in town.  This year, being Canada's 150th anniversary of confederation, we're considering  sending our cards even further afield. Some warm winter wishes from Canadians, sent across the world ❄.  So, if you know of a nursing home, within Canada or abroad, that would like to receive Christmas cards over the holidays, please let me know, at canadian_liner@hotmail.com.

Here's a card I made today, to get things started:
Background sponged with Catherine Pooler inks, "earth" coloured with Ken Oliver Color Burst powders. Die-cut village from Ellen Hutson; banner die from Simon Says Stamp; sentiment from Lil' Inker Designs; starts are Nuovo drops.

I look forward to seeing all the wonderful creations from the generous card makers out there.

To my Canadian friends, Happy Thanksgiving 🦃

Happy crafting,
Caroline

Thursday, 15 June 2017

Cross Canada Hop--Using up the 'Stash'

 
 Hello there, crafty friends!
It's time for another Cross Canada Blog Hop.
 
The challenge this month was to create artwork whilst "using up the stash." This idea really appealed to me--we are going to be moving house next winter, "down-sizing," and I'm going to have to purge some of my crafting supplies before then...

If you have just hopped onto my blog, you can start here as this is a circular hop, but if you want to follow us across Canada then please start at the beginning and visit Michelle at My Creations with Michelle. If you came from Nicky's blog then you are in the right place!

I decided to make a set of cards using some old bulk paper
 and Close To My Heart's "Wishes" card-making how-to book. 
This manual features a variety of cards in several different sizes. I used the instructions for one of the card-making workshops.
 This requires no the mental effort at all: just choose two identical sheets of patterned paper and three more solid coordinating card-stock sheets. The zip strip on the CTMH paper makes this easy; the ink colours are specified, so it was just a question of locating those colours amidst the stash of cardstock. 
The patterned paper was Kaleidoscope from a couple of years ago.
Details on how to cut up all the paper are given,
 along with diagrams and step-by-step instructions on how to assemble all those pieces of paper back together.
The card-making workshop on Page 68 makes 20 cards, two each of 10 designs. With CTMH's double-sided paper, you can choose which side to feature on any given card. I tried to limit myself to just three stamp sets for sentiments and decoration.
Further items needed include card bases for A2 size cards, ink pads, and some dies.
I also managed to use up a bunch of embellishment items, like rick-rack (from a looooong time ago), gems, sequins, etc. 
For each design, I made one card as indicated, then changed things up a bit for the second one, to demonstrate the versatility of these designs.
Let me know which is your favorite!
Card #1 is meant to be vertical, as is the card on the left. I used the stamp set C1605 Happy to Be Friends, which has many useful sentiments. The second version is landscape orientation, featuring the Happy Birthday die. I applied some yellow ink to white card stock  with a sponge dauber before cutting out the words, and inlaid them in the green layer.
Card #2  features the dotted zip-strip, some plain card stock strips, and the Hello and Thanks word dies. I cut the Thanks out of craft foam, for some added dimension. The die worked perfectly for cutting that thickness of material.
Card #3.  I added some glitter gems and old buttons. The Rustic Flowers stamp set, D1186 is the first CTMH stamp set I ever bought!
Card #4 demonstrates how you can use the same basic pieces to make completely different designs. I added a white square and purple mat to the second card, along with more of the zip-strip.
Card #5.  Adding some sponged colour behind the sentiment makes it pop, as well as tying it into the bokeh circles on the patterned paper base. I cut the small coral heart from two strips of shimmer trim stuck together onto printer paper. Do you remember those old corduroy brads?
Card #6. I LOVE the Hugs & Kisses die from Seasonal Expressions 1! It's so cheery:) Again, I added some shading to white cardstock before cutting out the die, and inlaid the pieces into the green strip, then added coordinating rick-rack. The sentiment comes from D1708 Sending Smiles available with the Cricut bundle.
Card #7 For this card, I cut down the card base to make a 4.25" square card, and embossed the pink panel with a vine embossing folder. The stitched ribbon is REALLY old, but still pretty. I stamped a cascade of flowers across the second card, using the Rustic Flowers stamps.
Card #8. Added a large stamped daisy and vellum vine die-cut, and some old glitter gems.
Card #9.  I was getting a little bored of the patterned paper, but remembered I had the 6x6 sample swatches from Kaleidoscope. I switched out a strip from another paper in the pack for the central panel, and added a die-cut heart. The left the centre of the heart blank, so I can add an appropriate sentiment later on.
 Card #10  has a cut-away front panel, with a cute slotted tab, to hold it closed. One of CTMH's velcro dots would work just as well. For the second card, I used some shimmer trim behind the Happy Birthday die this time, for added sparkle.
 
In the end, I only used up about 6 sheets of paper and some ancient embellishments... Not such a stash-buster! but I have some wonderful cards to use or give away, and I had a blast making them.
To purchase any of the items seen in our blog hop today, contact your local consultant to place an order.

Your next stop on the Cross Canada Hop is Sheena at Kanata Newf Papercrafts.
 
If you get lost along the way, head back to Michelle's blog, as she has the complete blog list.

We hope that you will take the time to leave comments on our posts, as we love to get feedback from our viewers....whether it was something that you really liked or some new technique that was used that you would like to learn how to do....by leaving us comments, we get to hear what you like, and what you want to see.
Thank you 😊
See you next month,
Caroline

Saturday, 20 May 2017

Please vote for me!

Hello crafty friends!
Here in Canada we are enjoying a beautiful long weekend of spring weather, barbecuing, cycling, admiring tulips, etc.

So why am I posting a Christmas card, you ask?

Over at Stamp Nation, there is a contest going on. You enter by posting a card made with Stamp Nation goodies, and ask your friends to vote for your entry.
Here is a cute card I designed last Christmas for the Caring Hearts Card Drive. It features the candy-cane strip background, stamped tone-on-tone and heat-embossed with clear powder, the frame die and sentiment from the Candy Cane lane collection, and finally, that adorable deer. We dearly love our even-toed ungulates (I had to look that up on Wikipedia) here in Canada: caribou, elk, moose, and of course, reindeer (although I think they may live in Scandinavia).

So get outside and enjoy the sun, but first visit THIS BLOG to vote for our cute friend.

Happy crafting,
Caroline

Monday, 15 May 2017

Meet....Jack!

 Cross Canada Blog Hop
Favorite New Paper Pack

This month, Close to My Heart released its latest catalogue, Seasonal Expressions 2.  It contains four new paper packs for your viewing pleasure. There is also a special paper pack created for National Scrap-booking Month, Live Beautifully.
Hop along with these talented, creative Canadians for some sweet sneak peaks.

If you've come from Nicky's blog, Simply Artistic, you're in the right place. If you wish to start on the East Coast, head to Michelle's blog, HERE and work your way west.

I chose to feature Jack.  As the mother of three boys (and yes, even my dog is a male) I'm always happy to find products for creating more masculine-themed projects. Unicorns and fairies just don't cut it...  Jack features a strong colour palette of red, black, grey and green, and some beautiful plaid patterns. There is also a bit of a lumberjack theme going on, which is PERFECT for the CFL team in my town, The Ottawa Red-Blacks, and their mascot, Big Joe Mufferaw.
 Ottawa will host the Grey Cup this autumn, and I'm sure I'll have some photos to archive from that event.

On to some projects!
Card #1

This release includes this BEARY cute stamp and die set. I used the bear claw paper with the zip-strip attached to make a backdrop for the bear. The "earth" is black glitter paper. The grey plaid mat is a PictureMyLife card from the  paper pack. I popped up the bear's snout and the banner with foam tape, folded his ears forward for some dimension and gave the nose and eyes some shine with Liquid Glass. Here's the inside of the card:
More use of the zip-strip, the die-cut "Happy" (from Happy Birthday Thin-cut) and rest of the sentiment from the Jack-Cardmaking stamp set.

Card #2
All those plaid patterns were screaming cozy flannel shirt, so I went with a patchwork/quilted look for the second card. I cut strips of paper in varying widths, as well as some of the zip-strips, and applied them to a piece of card stock which had been covered in double-sided tape. Then I ran the piece through my BigShot with a retired embossing folder. I sanded the edges and the embossed hearts for a worn look.  The sentiment comes from the Operation Smile stamp set, True Love, and the black glitter heart is cut using the Heart Thin-cuts.  Love the lumberjack paper! Reminds me of the NHL during the play-offs...

Layout 

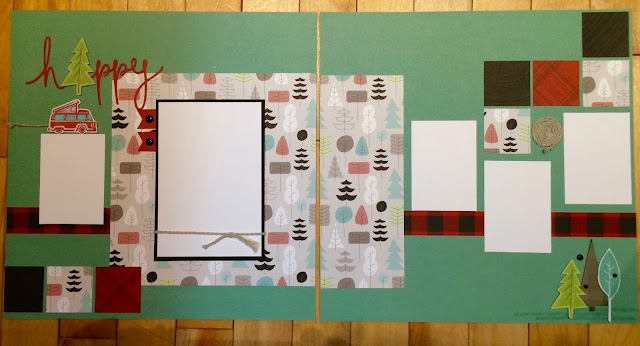
This two page lay-out design is available from your CTMH consultant, and features the hero paper, a medley of trees. Perfect for pictures of camping or other adventures in the great outdoors. 
 I used the camper van from the stamp set Camping Life and the big Happy Thin-cut for the title--"Happy camper..." The grey twine and black enamel dots are Jack complements. 
On the companion page, the trees are stamped and hand-cut with a retired stamp set, but the Jack Scrapbooking stamps +Thin Cuts set includes two tree stamps which would look great. The grey plaid tree was made using the Art Philosophy Cricut Cartridge, which is full of useful images.  I worked in a little more of the grey twine by using a Base-and-Bling adhesive circle, and winding some twine on top--looks like a rope or a cross-section of a tree, right?

Your next stop on the hop is Sheena at Kanata Newf.
Remember to leave comments and love as you hop, and contact your CTMH consultant to order any of the items which catch your fancy!

Happy hopping,
Caroline 

Saturday, 22 April 2017

Always chasing rainbows... Addicted to CAS

Good morning, crafty friends.

I created this graduation card for my son following a Stamp Nation challenge.
It looks deceptively simple, but contains a surprise.

It also fits the current code word at Addicted to CAS, which is RAINBOW!
You will note I didn't use the entire seven-colour palette for a proper rainbow. I focused on my son's favorite colours, one of which is purple.  I used Catherine Pooler inks, which work wonderfully for blending. I masked off the area for the rainbow and applied ink with a foam blending-tool. Next I used the MISTI to add the sentiment in black ink.  I added thin strips of black cardstock to define the rainbow section. A few stars and sequins hide some smudges!
Here's the inside:
An explosion of sentiments and fire-work-ish images.
 
The challenge at Addicted to CAS runs for another week--make sure to check it out.

Thanks for taking a look today!
Happy crafting,
Caroline

Supplies:
Catherine Pooler inks: Tiki Torch, Tiara, Lime Rickey, Aquatini, Something Borrowed, Flirty Fuschia and Midnight (black)
Cardstock: Catherine Pooler-white; Michael's-black
Stamp sets: Catherine Pooler, from the "Perfect Reason" collection
Sequins: Close to My Heart

Saturday, 15 April 2017

Cross Canada Hop--Alcohol Markers

Hello there, crafty friends!
Spring has finally sprung here in Ontario, just in time for the lovely long Easter weekend.
Canadian Close to My Heart consultants are celebrating with a blog hop
featuring ShinHan Twin-Touch alcohol markers.

If you've come from Dominique's blog, you are on the right track. If you'd like to start at the beginning, go to Michelle's blog where you will find the entire list of participants.

I have loved playing with alcohol markers since taking a Copic colouring course a few years back.
Close to My Heart sells 24 colours of the ShinHan Twin-Touch markers, along with a colourless blender pen; they work just as well as Copics for many colouring effects.
On today's card, I'm showcasing a couple of different techniques:

1)    No need to worry about not having just the right marker for your project; you can blend two colours together without contaminating either marker.
Scribble the darker shade onto an acrylic stamping block. This functions as your palette.

Pick up the colour on the block with the lighter shade of marker; you will get an intermediate shade to add to your project. To clean the lighter marker, just use it on white card stock until the colour runs true again.
Example: for the bunny's shirt, I coloured with Y22 Golden Yellow, then scribbled some YR24 Marigold onto my block. I picked up the darker orange colour with the yellow marker and used it to add shading to the image.
 I did the same with the bunny's shorts, using B68 Turquoise Blue and BG61 Peacock Green.

2)  I also created a fun piece of patterned paper, using my markers to make matching plaid. I added adhesive to the back of a piece of white card stock and stuck it to my Versamat.

I used the diagonal marks on the mat and the 14" ruler to draw parallel lines in Turquoise and Tender Pink.
 Then I rotated the mat 90 degrees and drew lines in that orientation to complete the plaid.

The ShinHan markers have two ends: a fine bullet tip and a broad tip. You can create lines of different width depending on which side of the broad tip you drag over the paper.
The speed with which you drag the marker across the paper will also have an effect--the slower you go, the more ink can sink into the paper, making a slightly wider line.

Break out your markers and give these techniques a try!
The next stop on the hop is Sheena at Kanata Newf.
Please remember to leave comments and love as you hop, quick like a bunny!

Happy Easter,
Caroline

P.S:  Next month's hop on May 15th will feature new paper packs from Close to My Heart.

Supplies:  all supplies Close to My Heart, unless otherwise indicated.
Stamp set: Easter Bunny/February 2017 stamp of the month
Ink: Archival Black, Fern
Markers: ShinHan Twin-Touch markers GY234, Y222, YR24, P282, P83, B68, BG61, RP198
Copic Markers in E31 and E33, R20.
Shimmer trim in green
Embossing folder: Lifestyle crafts/houndstooth
Versamat 12x12 crafting mat
14" ruler
Contact your local Close to My Heart consultant to purchase any of the items featured here.

Monday, 10 April 2017

Freshly Made Sketches & National Tartan Day...

Good morning, crafty friends.
This post is a little late for the celebration, but last Thursday, April 6th, was National Tartan Day in Canada. It's not an official holiday, just an observance, and has been in effect since 2010. It commemorates the signing of a document of independence in Scotland in 1320. People of Scottish descent can celebrate and wear their family tartan!

I've been playing around with plaid lately, with water colour paint and with alcohol markers. This is a paper version of the clan Macdonald tartan. It's much more beautiful in real life!
 The inspiration this week over at Freshly Made Sketches was all about squares.

Plaids and tartans are definitely all about right angles!  I decided to feature a piece of water-coloured plaid, with some of the stripes done with  opalescent gold paint.

 All squares were cut with Lil'Inker Designs' Stitched Mats square dies, then attached to a 5" square card-base. Along with the water-colour panel, I cut squares from Close to My Hearts' fundamentals collection. These papers have white designs on one side, with embossing on the other. The sentiment is from Catherine Pooler Designs' "Hello World" stamp set. Pretty easy card to put together!

Make sure to check out the amazing submissions over at Freshly Made Sketches.

Fare ye weel!
Caroline


Thursday, 30 March 2017

Mixed Media Mayhem!


Good morning, crafty friends.

I had to jump on board the Distress Oxide ink band-wagon after seeing several people's demonstration of their potential and:
  • ordered a half dozen colours to try out;
  • discovered a bottle of Frisket, the masking fluid, probably purchased sometime in 2016 and never opened, under a pile of patterned paper on the craft table;
  • needed a new "miss you" card for my hubby's suitcase...
All the right ingredients for an experiment!

Here's my card:


I bought this stamp set from Close to My Heart last year---my DH was a chemistry student when we met, so the sentiment is perfect!
I started by stamping the beakers onto the card base with archival black ink. I used a paper mask to give the illusion of one beaker being behind the other.
Then I covered them both, and the sentiment with the Frisket liquid. It's pretty easy to use, and dries translucent so you can see what is underneath.
Then I went to town with three colours of Distress Oxide ink: spiced marmalade, broken china and cracked pistachio. I smooshed the ink onto a craft mat, spritzed with water and then dragged the card base through the ink. Dried it off and began again; added some splatters... Very satisfying and completely random. 
Once it looked like a small explosion, I rubbed off the Frisket and coloured the beakers with alcohol markers. Added some bubbles from the stamp set with Oxide inks. And coated the beakers with Liquid Glass so they'd look glassy.
I just love the result!
 Let me know what you think, or tell me about your experiments with Distress Oxides.

Have a creative day!
Caroline

P.S.: getting in, better late than never,  to Kathy Racoosin's 30 Day Colouring Challenge, on Day 30!
Also linking up to Simon Says Stamp's National Craft Month post HERE

Monday, 27 March 2017

Freshly Made Sketches #280


Good morning, crafty friends.

I've been working on spring birthday cards and was inspired by a YouTube video from Jennifer McGuire this week, as well as the current Freshly Made Sketch:
Jennifer was doing some ink-swiping with balloons. They certainly say "celebration," perfect for my 15-year-old niece's birthday (not too cutesy). The only balloon stamps I had were not big enough in scale for this sketch, so I decided to use patterned paper instead. I free-hand drew the balloons onto the paper with a coloured pencil and cut them out.
Then I popped the one in front up with a spring, for dimension and playfulness.
I used a well-loved Cuttlebug embossing folder for the background, which also serves as the sentiment. Some twine tied to the balloons completes this simple card.

Stop by the Freshly Made Sketches blog for some more inspiration!

Have a crafty week,
Caroline

Supplies:

Card stock: Close to My Heart white daisy; patterned paper from retired Magical paper pack
Embossing folder: Happy Birthday from Provocraft/Cuttlebug
Twine: Michael's
Ink:  Derwent Inktense watercolor pencil
Spring: Close to My Heart